Please note, we are moving away from DD-WRT, as both projects have seen limited development, and do not support the latest features like Wi-Fi 6 and WireGuard. If you’re looking for more information about VLAN or want to see the best VLAN routers, explore our dedicated VLAN page.
If you still want to use DD-WRT and need assistance with setting up VLAN on your DD-WRT network, we can assist you with our Flash My Router Plan!


FLASH MY ROUTER SERVICE INCLUDES:
- 1-on-1 Session With Expert Technician
- Basic Internet/Wi-Fi/VPN Setup
- Open Source Firmware "Flash" Upgrade
- Includes a $30 Service Credit
Quick Overview
At FlashRouters, our primary goal is to inform users of the benefits of taking back control of their network by unleashing the true power of their router. Routers using DD-WRT Firmware offer a multitude of features, from VPN integration and QoS (Quality of Service) to DNSMasq & Bandwidth Monitoring/Access controls. Another popular feature of DDWRT: VLAN tagging. In this post, we detail how to create a full VLAN setup with DD-WRT.
Best FlashRouters for DD-WRT VLAN Setup
And, if you’re looking for the easiest way to set up your VLAN, our FlashRouters come with DD-WRT pre-installed for quick and easy setup!
Linksys MR7350 WiFi 6 AX1800 DD-WRT FlashRouter – Upgraded with Latest DD-WRT Firmware / WiFi 6 AX1800 SALE PRICE: $179.99 $279.99 | BUY NOW
Flash My Router – 1-on-1 Session With Expert Technician / Basic Internet/Wi-Fi/VPN Setup / Open Source Firmware "Flash" Upgrade / Includes a $30 Service Credit PRICE: $100 | BUY NOW
What is VLAN (Virtual LAN)?
According to Wikipedia, “In computer networking, a single layer-2 network may be partitioned to create multiple distinct broadcast domains, which are mutually isolated so that packets can only pass between them via one or more routers; such a domain is referred to as a virtual local area network, virtual LAN or VLAN… More sophisticated devices can mark packets through tagging, so that a single interconnect (trunk) may be used to transport data for multiple VLANs…”
One aspect of a VLAN is the ability to create separate networks on the same router for security and segmentation purposes. Employing a VLAN setup is a useful procedure if you have some devices on your network that you want to isolate from others. In doing so, you can use a VLAN to provide Internet access to family and friends without giving them access to your entire network. Best of all, the settings can easily be changed and adapted to however you want to set up your network.
What Are the Benefits of VLAN?
A VLAN has the same attributes as a physical local area network (LAN), but it allows for devices to be grouped together more easily even if they are not on the same network switch. Most enterprise-level networks today use virtual LANs.
Without VLAN functionality, you would need separate collections of network cables and equipment from your primary network. And if you didn’t plan this in advance, you could expect a costly rewiring job in your home or office. Unlike physically separate networks, VLANs share bandwidth, so VLAN trunks may require aggregated links and/or quality of service prioritization for maximizing their capability.
For many users, VLAN alone is enough of a reason to switch to third-party alternative firmware like DD-WRT.
How to Create a DD-WRT VLAN Setup
Now on to the fun!
In this DD-WRT tutorial, we will set up VLANs for each Ethernet port. This will create a network on each port that is isolated from all the other ports. An Asus RT-AC66U has been used for this tutorial, and while this same interface is pretty constant throughout any popular DD-WRT-enhanced router, setups may vary depending on your firmware build and router model.
Linksys MR7350 WiFi 6 AX1800 DD-WRT FlashRouter
$279.99
- Upgraded with Latest DD-WRT Firmware
- WiFi 6 AX1800
DD-WRT VLAN Configuration of Ports 1-4
Go to https://192.168.1.1/ (or your router management IP address) in your web browser.
Select Setup -> VLANs.
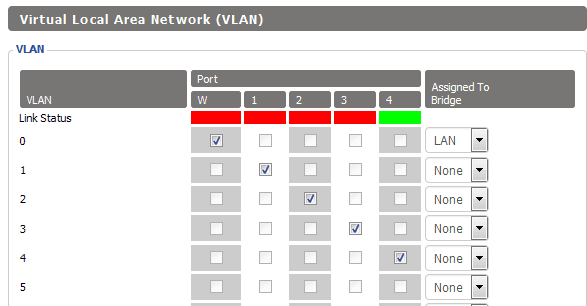
Uncheck ports 1, 2, 3, and 4. Place port 1 into VLAN1, port 2 into VLAN2, and port 3 into VLAN3, port 4 into VLAN4. Set the WAN port to VLAN0.
When this is done, the VLAN configuration page should look like this:
Click Save, then Apply Settings.

VLAN Configuration on Each Port
- Next, plug an Ethernet cable into port 1 on the router from your computer.
- Unplug the router power for 30 seconds and then plug it back in. Wait for the lights to return to normal.
- Go to Setup -> Networking.
In this tutorial, we will create a subnet for each VLAN.
VLAN1 will have the subnet 192.168.1.0. VLAN2 will have the subnet 192.168.2.0. VLAN3 will have the subnet 192.168.3.0. VLAN4 will have the subnet 192.168.4.0.
That means devices on VLAN1 will be assigned addresses such as 192.168.1.15 and for VLAN2 192.168.2.50
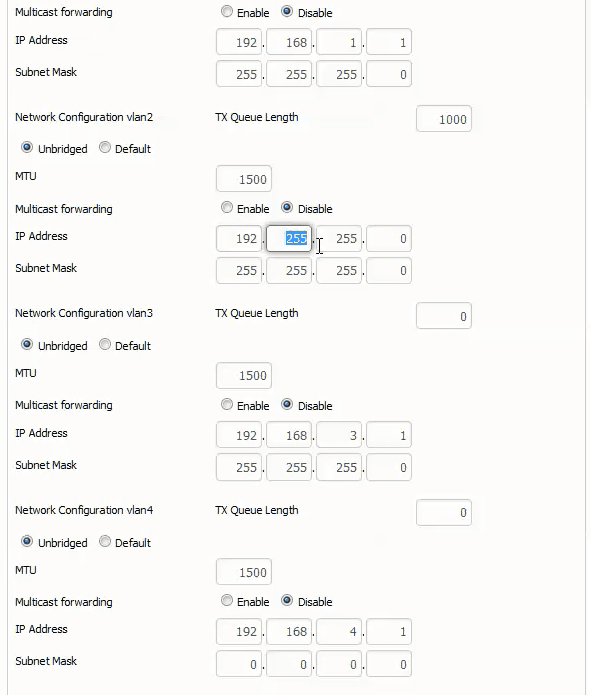
Under Port Setup set VLAN1 to Unbridged.
Set the IP Address to 192.168.1.1. Set the Subnet Mask to 255.255.255.0
Change VLAN2 to Unbridged.
Set the IP Address to 192.168.2.1. Set the Subnet Mask to 255.255.255.0
Change VLAN3 to Unbridged.
Set the IP Address to 192.168.3.1. Set the Subnet Mask to 255.255.255.0
Change VLAN4 to Unbridged.
Set the IP Address to 192.168.4.1. Set the Subnet Mask to 255.255.255.0
Save your changes by clicking Save. When the interface responds, the Port Setup section should look like this:
Configure DHCPD
Below the Port Setup area, you will see a section titled DHCPD.
What this area does is allow you to create multiple automatic assignment addresses for IP addresses in a network. So, whenever someone authenticates into this section, this VLAN will assign it a user address in your network. This creates 4 sets of automatic assignments within the 4 new segments of your network to be handled by the router automatically in the future.
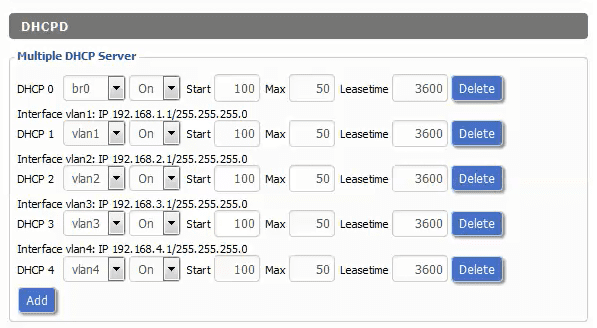
Under DHCPD click Add. Set DHCP 0 to vlan0 with a Leasetime of 1440 (24 hours). Click Save.
Click Add again. Set DHCP 1 to vlan1 with a Leasetime of 1440 (24 hours). Click Save.
Under DHCPD Click Add. Set DHCP 2 to vlan2 with a Leasetime of 1440 (24 hours). Click Save.
Once again, Set DHCP 3 to vlan3 with a Leasetime of 1440 (24 hours). Click Save.
And a final time, click Add. Set DHCP 4 to vlan4 with a Leasetime of 1440 (24 hours).
Click Save. Let it save. Then, click Apply Settings.
Once completed, the DHCPD -> Multiple DHCP Server section should look like this:
Plug your Ethernet cable into any port on the router aside from port 4 or the WAN port. Unplug the power for 30 seconds and then plug it back in. Wait for the lights to return to normal.
Adding Firewall Rules to Isolate the VLANs.
Now, we have created 4 network segments, but we need to use a firewall to fully isolate them from each other. These commands block all VLANs from communication with each other.
Browse to Administration -> Commands.
Copy and paste the following commands into the Commands text box:
iptables -I FORWARD -s 192.168.1.0/255.255.255.0 -j DROP
iptables -I FORWARD -s 192.168.2.0/255.255.255.0 -j DROP
iptables -I FORWARD -s 192.168.3.0/255.255.255.0 -j DROP
iptables -I FORWARD -s 192.168.4.0/255.255.255.0 -j DROP
Click “Save Firewall”.
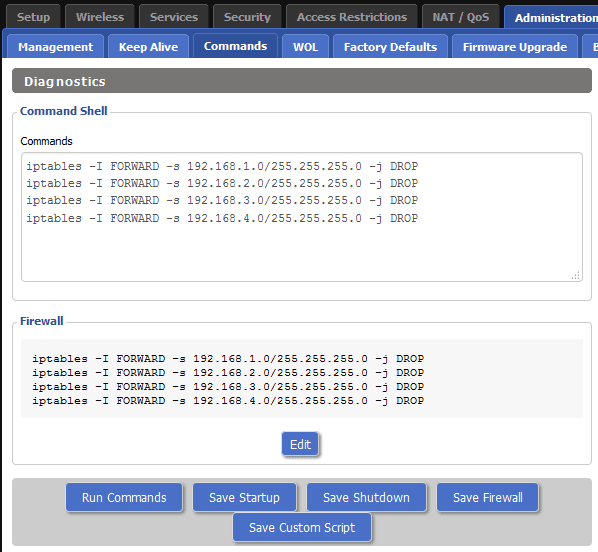
Your DD-WRT VLAN basic configuration is now complete.
Testing the DDWRT VLAN Setup
To test each VLAN, connect to that port. Take note of your IP address and see if your local IP address changes in your network. If it changes, you have correctly set up VLANs, great job!
Looking for some DD-WRT VLAN-ready routers? Check out our full selection of DD-WRT pre-installed routers.


